


Table of Contents
Share this article
Learn from the brightest minds how to predictably and efficiently grow revenue.
Related Content
Improve your win rates by 117% by spotting these slippage red flags
easily identify the telltale signs of risk that an opportunity is going to slip. Equipped with this knowledge, sales teams can then be proactive to salvage these opportunities, close them faster and improve win rates.
How to Analyze your Sales Pipeline – Measuring Your Pipeline Health
The key to understanding how your pipeline is performing is knowing what state it is in. The gauge of that is pipeline health. In the first of our series, we looked at creating the foundations of your pipeline and the metrics that are needed to know what is happening within it. In this article, we…
What is Revenue Operations?
They say all roads lead to Rome. If you imagine Rome as revenue, then the role of revenue operations is to make sure that those roads are built in the most efficient way and that they are effectively signposted. Revenue operations, or “rev ops” in it’s shortened form, is the strategic alignment of sales, marketing,…

The Guide to Setting Up Forecasting in Salesforce
Companies use sales forecasting to predict business performance. It’s a helpful tool for budgeting and setting expectations for the C-Suite. Sales forecasting is crucial for almost any business, because it affects sales deployment, financial planning, budgeting, operations planning, and marketing planning. Since sales forecasts have far-reaching impact, it’s critical that the forecast information is as accurate as possible. In this guide, we’ll share a step-by-step process for creating and managing effective sales forecasts.
Table of Contents
What Is Forecasting in Salesforce?
Sales Forecasting will help your business get a better grasp on how much you’ll make from sales over a defined time period. For that reason, it helps people throughout your business, from managers to directors to C-suite executives.
HubSpot provides a useful definition of what sales forecasting is:
What is Customizable Forecasting in Salesforce?
Customizable forecasting in Salesforce is an accurate, flexible tool that has helped countless organizations accurately predict revenue from sales. Customizable forecasting also enables you to get a sneak peek of the products or services you are likely to sell.
With the robust tool, you can select different date ranges and predict sales in these ranges. The tool is among Salesforce forecasting modules that allows you to use revenue and quantity to forecast sales. The flexible solution has also proved decisive for companies with advanced requirements.
Setting up this feature requires you to enable Customizable Forecasting and define settings plus individual features. Once you allow this tab, users in your company can view and submit customizable forecasts based on your settings.
You’ll also find five standard report types that are not customizable. It is always good practice to specify settings that work best for your company when working with Salesforce Forecasting modules, and the customizable feature is no exception.
Salesforce Customizable forecasting allows to you set your fiscal year for forecasting. In this case, you get to decide your forecasting cycles – either monthly or quarterly. The forecast hierarchy is the other important feature of this module. You’ll list all the users, enable them with the Allow Forecasting permission, and decide how each forecast will accumulate with time.
Don’t forget to update the forecast hierarchy. Managers need to keep tabs on their junior’s forecast amounts. Speaking of managers, they are part of the hierarchy and perform specific roles — forecasts of everyone below the manager in the hierarchy roll up to the hierarchy manager.
When it comes to submitting the forecasts, you take Salesforce forecast snapshot of data in your projections. Submit the estimates in batches and save time in the process.
With these great features, Salesforce customizable forecasting has remained a firm favorite among businesses. The bad news is that 2020 will be the last we see of Salesforce Customizable Forecasting. Salesforce already provided Collaborative Forecasting, discussed above, as a suitable alternative for companies.
How to Setup Forecasting in Salesforce
With Salesforce, you should create customizable reports with ease. Follow these straightforward steps to set up forecasting in Salesforce.
1. Define Forecast settings
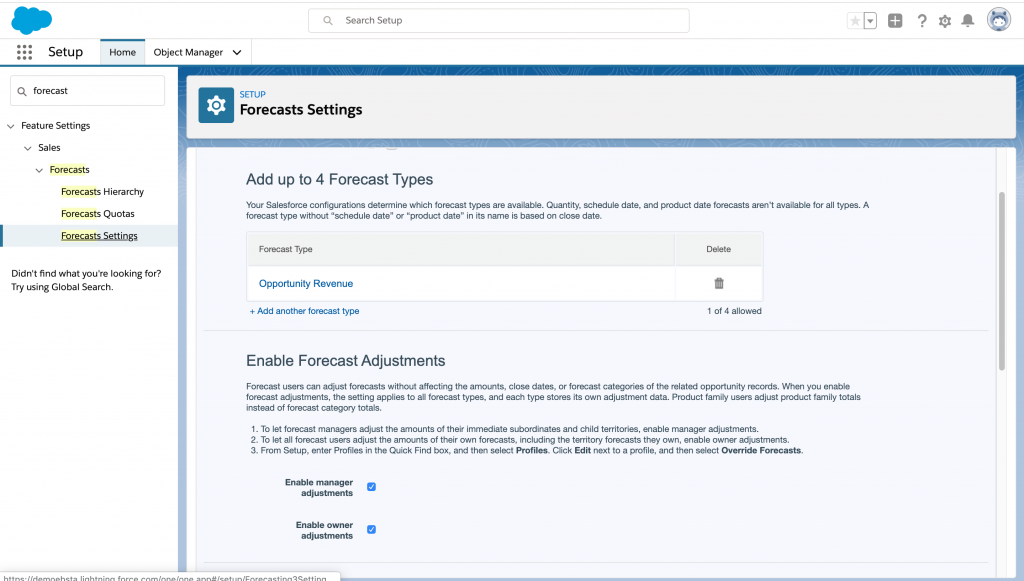
Here you get to select the most appropriate forecasts for your company.
- Find this in the Quick Find box by searching Forecasting and enable the forecast that best suits your business. You can always add another forecast type if you deem it fit.
- You’ll also need to choose what information will be available on the forecasts page. This information could be anything from opportunities, product families to overlay splits. The sales team should have a more straightforward time assessing revenue and quantity projections. All these will be available in the sales pipeline.
- As you define the settings, you should be clear on the measurements that will guide your forecasts. You could either select revenue, quantity, or both depending on your preferred forecast type.
- While at it, remember to select the forecast date type, especially if you choose to work with the Lightning Experience. The date could either be the scheduled date, close date or product date. On product families, clarify the families that each user will handle.
2. Enable Users
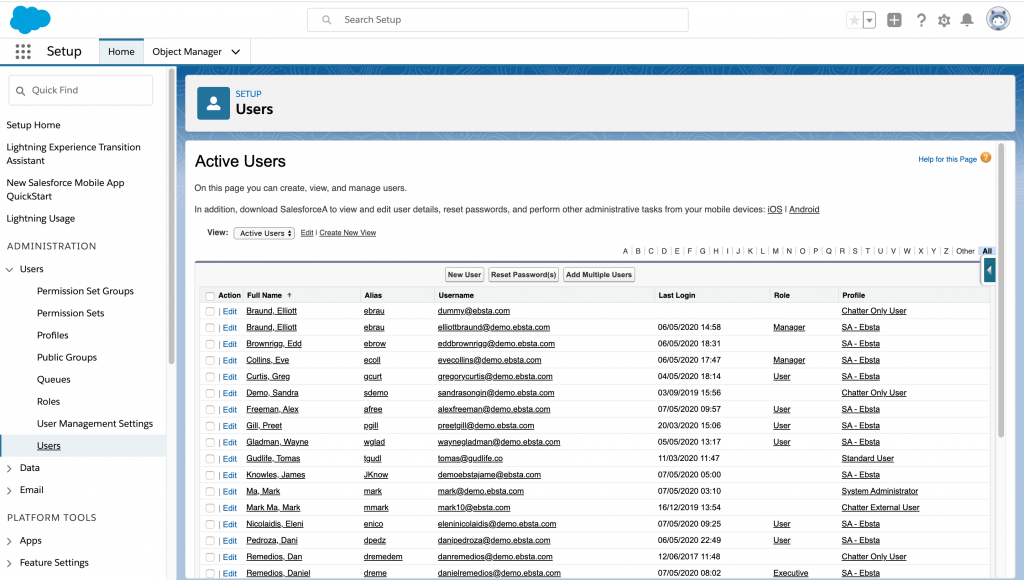
Not everyone will have access to the forecasts. You’ll need to select users, probably members of your sales team and a couple of executives. You’ll then need to edit the general information of the selected users to allow forecasting.
These users will become part of your forecast hierarchy (we’ll discuss this in the next step). With time, you can choose to enable new users or disable existing users depending on the growth of your company.
- To enable users, go to the Force.com Home navigation bar on the left hand side of your screen. Under “Administer” “Manage Users” select “Users”.
3. Create a Forecast Hierarchy
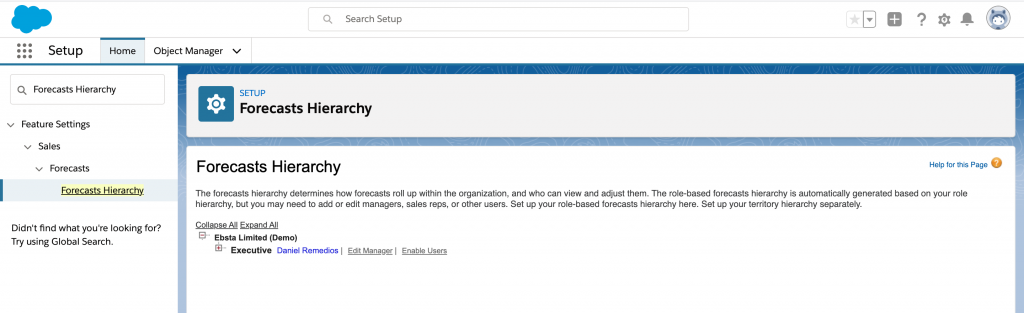
Once you are clear on the designated users for your forecasts, you’ll need to set up a forecast hierarchy. Your organization’s hierarchy of users should inform how you create the forecast hierarchy. Don’t forget to update this hierarchy as often as possible. The regular updates ensure that everyone is up to speed with the available forecasts.
The hierarchy includes forecast managers that are responsible for several subordinates. The manager’s forecasts will consist of all the estimates from their subordinates. With the managers in place, ensure that you have given them the forecast manager designation in your hierarchy.
You can opt to create specific territories for better monitoring of the forecasts. A forecast manager is usually in charge of such territories.
- From Setup, enter Forecasts Hierarchy in the Quick Find box and select Forecasts Hierarchy.
4. Choose a Forecast Currency
This step is especially vital for organizations that use multiple currencies in their operations. Work with your sales team to figure out the best currency for your forecasts.
- From Setup, enter Forecasts Settings in the Quick Find box, then select Forecasts Settings.
- Next to Forecast Currency, choose a forecast currency option.
- Save your changes.
5. Determine the Forecast Date Range
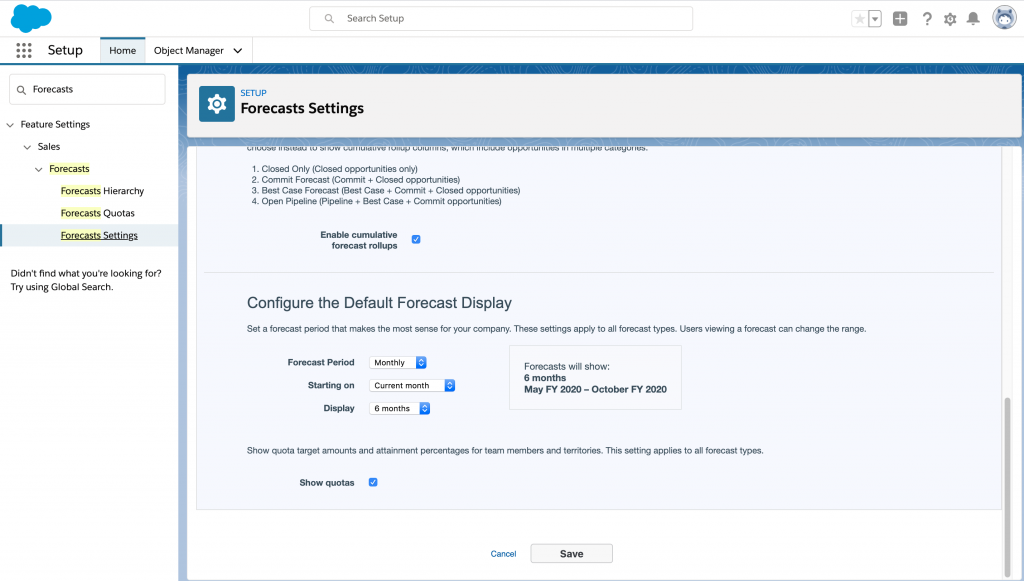
Depending on your settings, your forecast will include amounts from monthly or quarterly reports. You could either go for the custom or standard fiscal years.
Once you choose the date range, Collaborative Forecasts users will find this as their default. The users can always customize the date range for their forecasts.
- From Setup, enter Forecast Settings in the Quick Find box, then select Forecasts Settings.
- Under Configure the Default Forecast Display, select a beginning period and the number of periods to show.
- Save the changes.
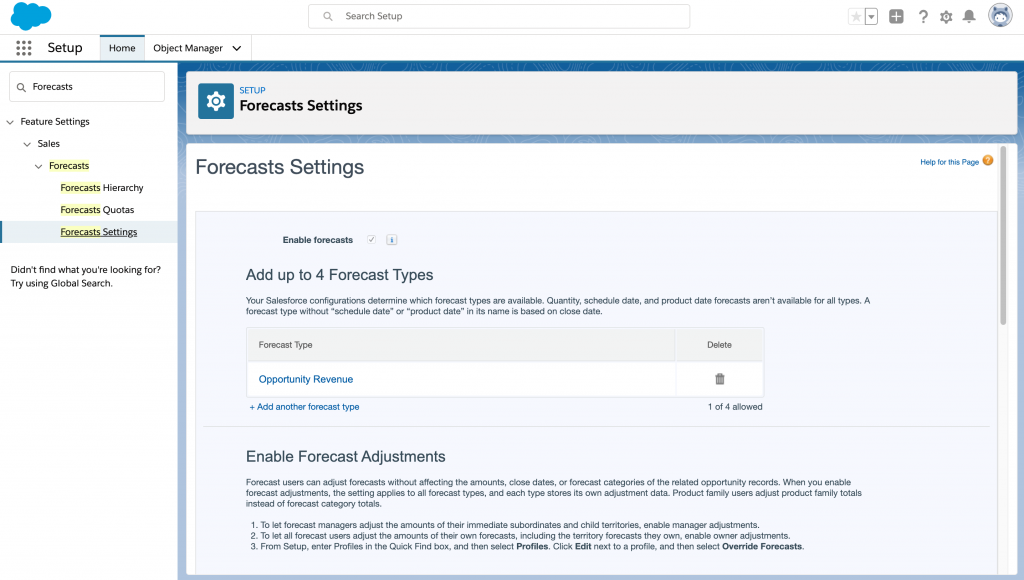
6. Customize Forecast Categories

Within your forecast, you’ll need to assign different opportunities to forecast categories. The categories could either be Pipeline, Closed, Commit, Best Case or Omitted depending on the stage of the opportunity.
Salesforce enables you to select data that you’ll find in the forecast. Provisions for the date start and the scope of the estimates are also available. For privacy, you get to decide whether or not people can share data.
As you customize the settings, be sure to select the forecast period. Salesforce also requires you to include users with specific forecasts. This section allows you to give access rights to different users. Check the accuracy of your settings before you hit the Set up button.
- On the Forecasts Settings page, under Enable Forecast Adjustments, select Enable manager adjustments.
- Select Enable owner adjustments, and click Save
Side note
Do you have partners working alongside your sales team? Well, Salesforce forecasts allow you to include these partners in your forecast hierarchy. The amounts from the partner’s opportunities become part of your projections. The only downside is that such users won’t access Collaborative Forecasts.
Need Some Help Setting Up Forecasting?
With all these insights, you have a pretty good idea of how forecasting works in Salesforce. Businesses with an accurate Salesforce forecasting plan can manage their sales expectations with ease.
And once you have your forecast set up, it’s now time to add another dimension: true customer engagement.
Using Ebsta Team, you can track engagement between a rep and their prospects, which we then surface in Salesforce to incorporate into your reporting. Our 1,000 customers are using this data to reduce sales cycle, increase close rates and identify opportunities at risk.
You can request a demo of Ebsta Team here.